Software Archive

433MHz MX-RM-5V receivers and antenna attachment

Posted November 4, 2018 By Landis V

I’ve been playing with Arduino (technically, ESP-M3) and a cheap 433 MHz receiver I picked up from eBay, model MX-RM-5V (also marked 080408).  I managed to get a basic program working that used RCSwitch and PubSubClient to push message information to my MQTT server when I pressed a button on an inexpensive Spigen 433MHz doorbell I had purchased, but unfortunately the range was limited to only about a yard.  I understood that adding an antenna to these receivers had the potential to significantly increase the range, but everything I found suggested that the receiver I was working with was slightly different than the standard MX-RM-5V receiver, and that my antenna attachment pad actually sat between the two contacts for the induction coil.  I tested the attachment of an antenna here, and found that it didn’t work.  Every picture I could find of this receiver showed a different induction coil than what I had.

Today, it finally occurred to me that maybe my receivers had been made incorrectly.  Since I’d ordered a four pack, I dug through the other three, and sure enough, two of them have the three coil inductive loop seen on every picture of these on the Internet, and connected to the pads they are typically connected to.  The other two – including the one I happened to chose to work with – have an eight coil inductive loop, which bears a suspicious resemblance to the inductive coil present on the transmitter.  Looks like I just happened to be the lucky guy who received the components assembled by the new guy on the production line.  Wanted to share this in case a similar issue comes up for anybody else.

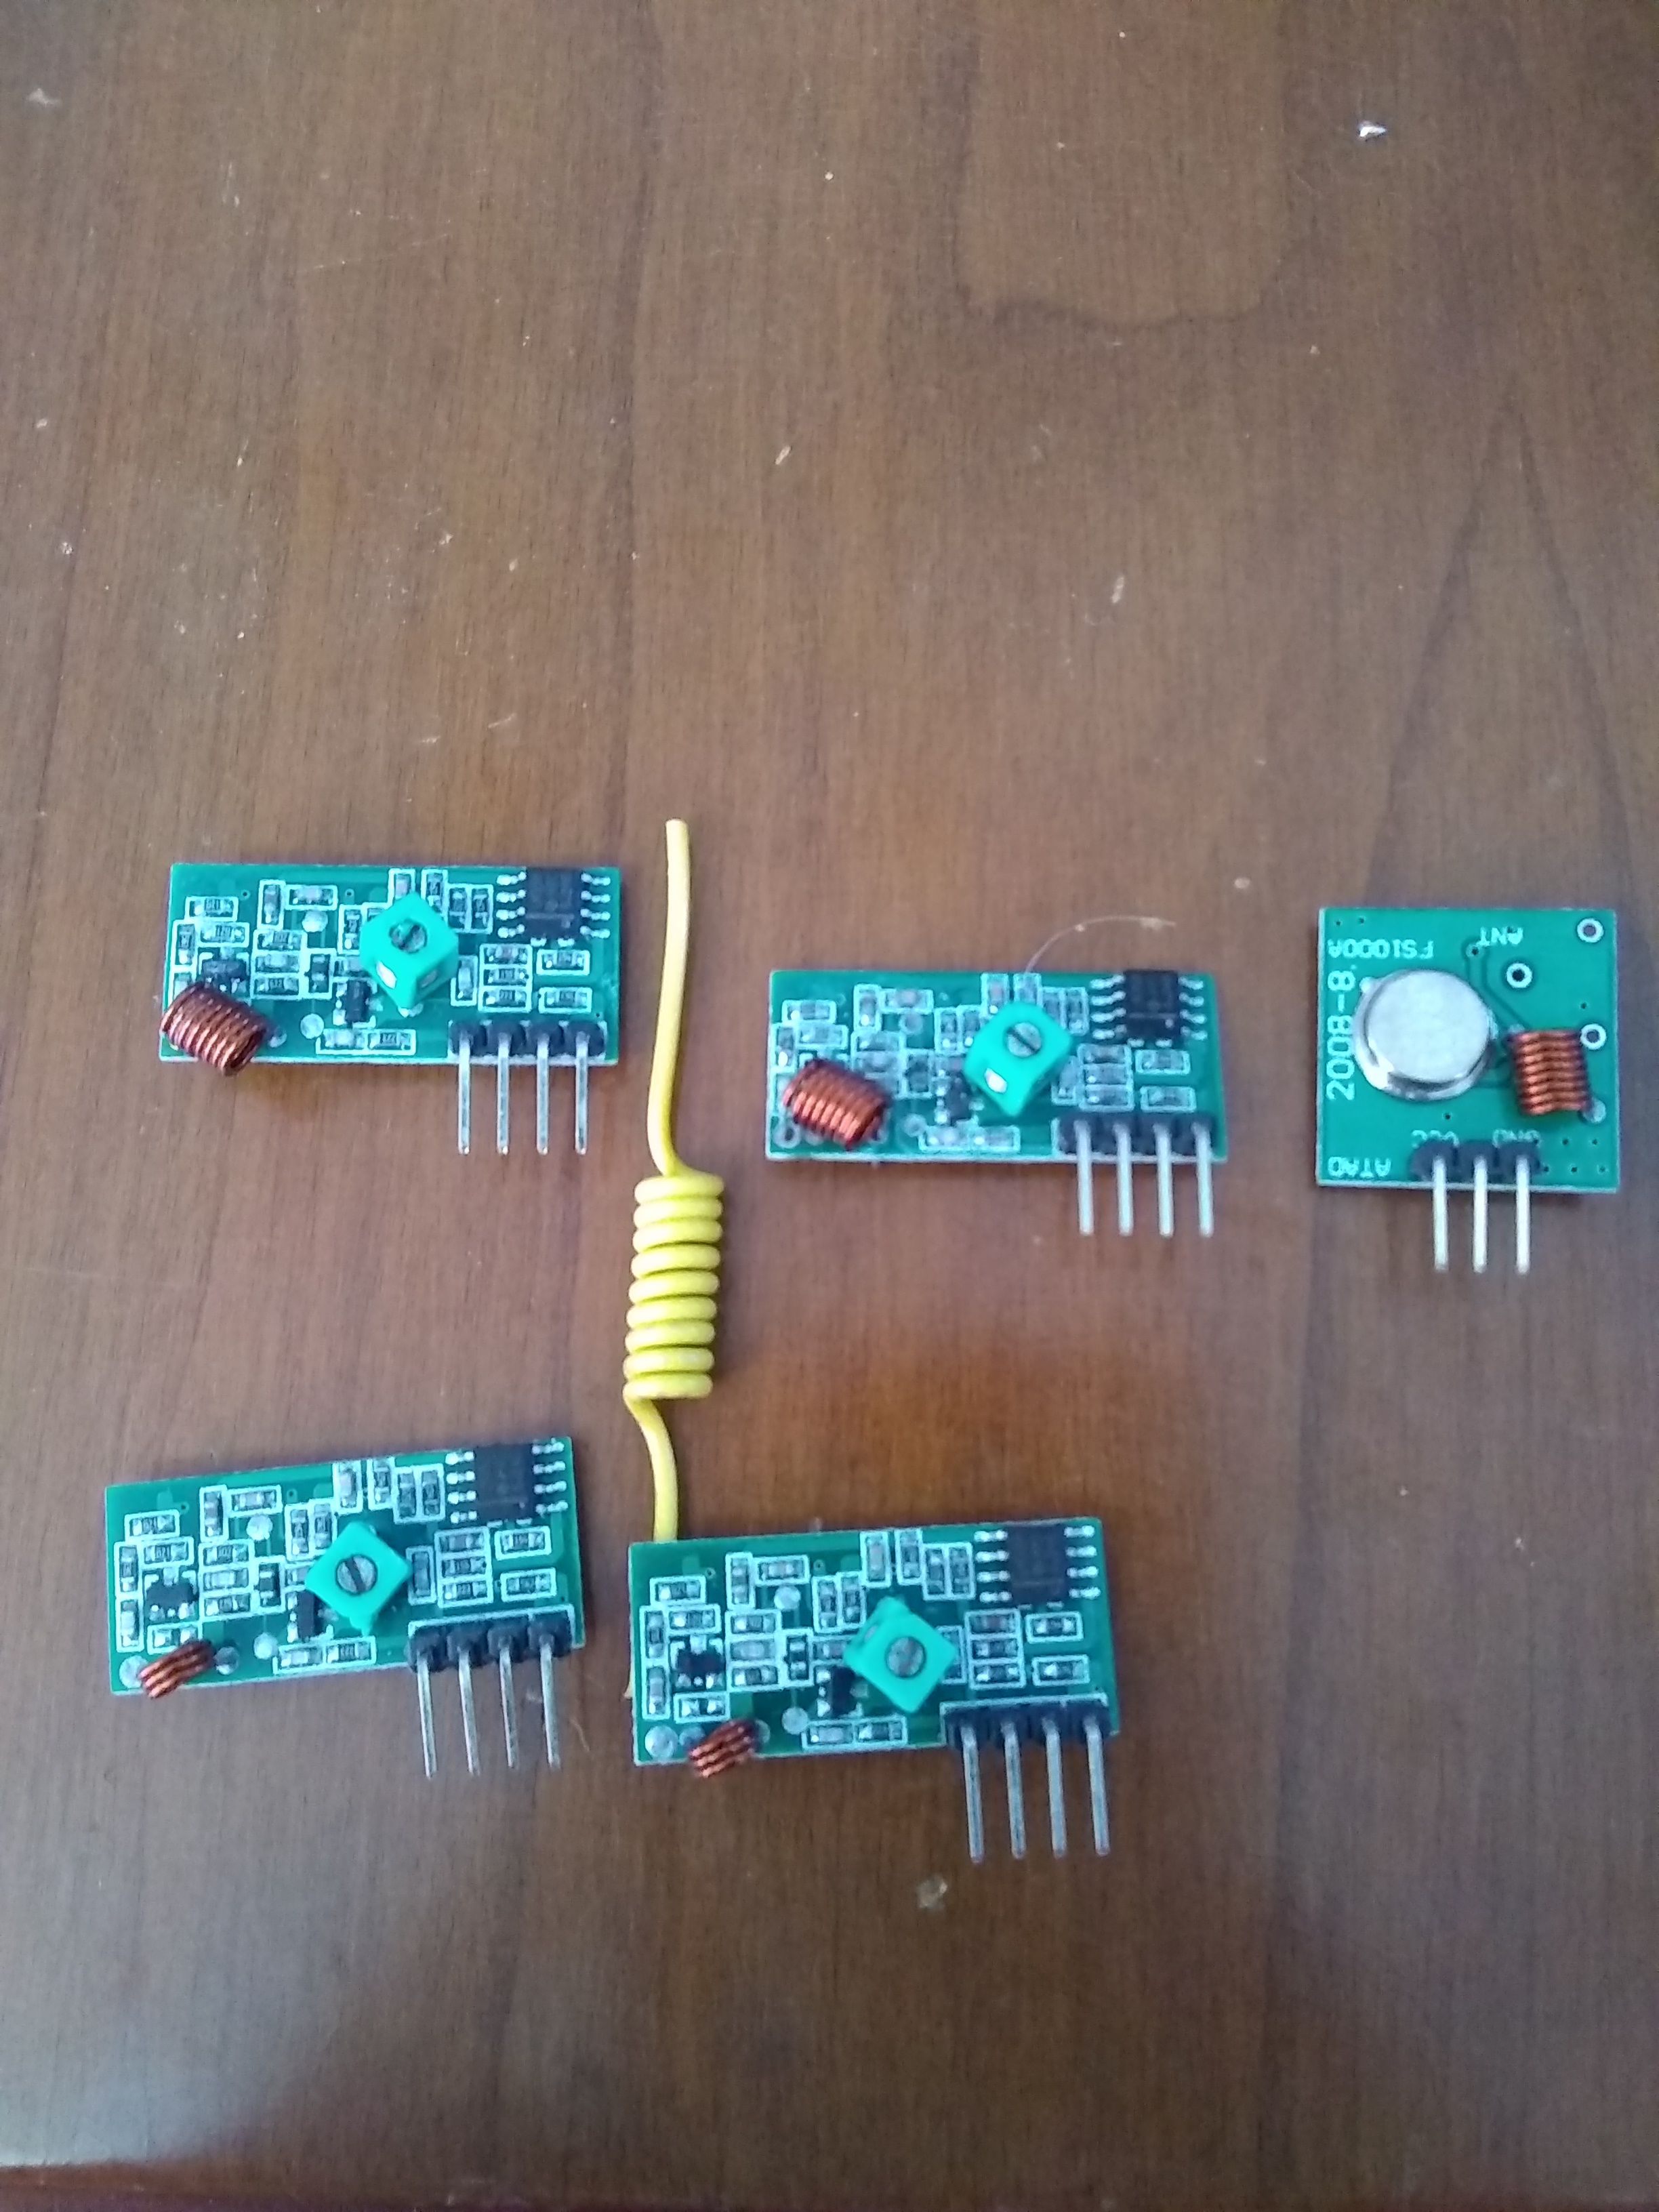
The four receivers, and a transmitter (top right). You can see that the inductive coil on the top two (problematic) receivers looks suspiciously like the one installed on the transmitter. This was taken after attaching my antenna to one of the correctly made receivers and testing.

Once I connected an antenna (see https://www.instructables.com/id/433-MHz-Coil-loaded-antenna/) to one of the properly made receivers, my reception increased from a yard to maybe 30 feet, and also gave me the capability to receive signal through an exterior wall which is what I really wanted.

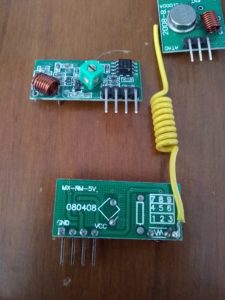
Close-up of the properly made receiver with the antenna attached, with an improperly made receiver above.

Be the first to comment

Mounting VirtualBox RAW disks

Posted December 2, 2017 By Landis V

Cleaning up some VMs this evening and wanted to mount a RAW disk partition I’d been using with an old VM. Surprised to find that a simple ‘mount’ wouldn’t do the trick. Fortunately pretty easy thanks to the info at the following link – use parted to get the offset and add that as one of the mount options.
https://askubuntu.com/questions/236263/browse-img-without-mounting

Be the first to comment

hostapd in a VM for device testing

Posted November 27, 2016 By Landis V

While working with my Chamberlain MyQ Garage Door Opener the other day, I ran into issues getting hostapd to work on Kali with the chap ass Netis WP2120 nano USB adapter I had (based on the RTL8192cu chipset/driver).  I need to clear off a few browser tabs and eventually see if I can get hostapd working with this adapter on a different box (VM) for testing.  A few of the links I worked with unsuccessfully, but provide some useful information.


More notes

Installed usbutils for lsusb
Installed hostapd
Installed iw
Installed lshw
Ran through steps at https://adamscheller.com/systems-administration/rtl8192cu-fix-wifi/, minor issue with “linux-headers-generic”, skipped it for now.

Did receive a modprobe error, “could not insert ‘8192cu’: Device or resource busy”. lsmod shows the old rtl8192cu drivers active. Did a reboot. Correct driver modules now listed, though no device listing in ‘iw list’. Does appear in ‘lshw -c network’, and appears as wlan0 in ‘ip link list’.

Started in with hostapd steps from http://sarumait.blogspot.com/2013/11/ubuntu-wireless-hotspot-using-edimax-ew.html and from my previous testing on the Chamberlain page.

Attempted to start hostapd service which seemed to work, but didn’t see my SSID. Ran it interactive debug and got an “invalid/unknown driver ‘8192cu'”.

Instructions at https://github.com/pritambaral/hostapd-rtl871xdrv
Git cloned the above repository and the w1.fi repository listed. Got hostapd to build after installing dependencies (below).

apt-get install apt-file libnl-3-dev libnl-genl-3-dev pkg-config libssl-dev
apt-file not needed, but handy for looking up files that resulted in failures during make.

Ran the patch process noted at https://github.com/pritambaral/hostapd-rtl871xdrv

Ended up having some success after doing a ‘make dkms’ in the rt8192cu directory cloned from https://github.com/dz0ny/rt8192cu and setting the driver in my hostapd.conf to the rtl871xdrv

Pages helpful in getting it to work

2 Comments so far. Join the Conversation

Chamberlain MyQ Garage Door Opener Testing

Posted November 27, 2016 By Landis V

Got a great deal on some Chamberlain MyQ wifi garage door openers recently.  As I’m setting them up, I really want to see what kind of conversations they have, so I’ll be making a few notes.  As usual, I’ll be working with my VM setup, using Kali in this case.

I have a Netis WF2120 USB wireless adapter that I’ll be using under Kali.  The vendor/product code is 0bda:8176.  Planning to use Kali as an AP.  I installed hostapd on Kali with ‘apt-get install hostapd’.  Added a USB filter to pass the Netis through to the guest with ‘vboxmanage usbfilter add 2 –target kali –name NetisWIFI –vendorid 0x0bda –productid 0x8176’.  After shutting down and restarting the VM, my wireless adapter was available as wlan0.

Enabled root login for SSH on my Kali box as VRDE… sucked.  Slow and very unresponsive.

Created /etc/hostapd/hostapd.conf with approximately the following contents:
ssid=TheSSIDOfYourChoiceWillEndYourLifeTonight
wpa_passphrase=YeahPostThat
ctrl_interface=/var/run/hostapd
interface=wlan0
driver=rtl8192cu
channel=1
wpa=2
wpa_key_mgmt=WPA-PSK

Edited /etc/default/hostapd and configured ‘DAEMON_CONF=”/etc/hostapd/hostapd.conf”‘.

Attempted to start the hostapd service, got “Line 5: invalid/unknown driver ‘rtl8192cu'”.

Tried editing NetworkManager.conf and adding a keyfile configuration to exclude the MAC of the device, followed by restarting /etc/init.d/network-manager, without much success.  Yielded same error.

Ran a ‘modprobe -r rtl8192cu’ and attempted to restart the hostapd service with the same error.  Tried changing the “driver=” line to ‘driver=rtl871xdrv’ with the same results as well.

Remarked the “driver=” line in hostapd.conf and attempted to restart the service; got a little further, but still did not seem to start.

Went back to the instructions at https://bogeskov.dk/UsbAccessPoint.html.  The ‘apt-get install linux-headers’ was not successful on my platform, so ran ‘apt-get install linux-headers-4.6.0-kali1-amd64’ instead, which was already installed in my case.  Created and cd’ed to an rtl directory, then ran ‘git clone https://github.com/dz0ny/rt8192cu.git’.  Attempt to make drivers failed.

Ran an ‘apt-get update’ and ‘apt-get upgrade’ to see if I could get around the issue.  Seem to be issues with the 4.8.x kernel on Kali as well; system fails to boot using that kernel.  Have to come back to this one later, will create another post for hostapd with the rtl8192cu and see if I can come up with a better way to work around that problem.

Might be useful to take a look for the referenced article on burp from http://cybergibbons.com/security-2/quick-and-easy-fake-wifi-access-point-in-kali/ once I get hostapd on solid footing on its own (which is getting closer).

Additional Links

Be the first to comment

I hate it when I’m away from home and either the ISP or some of my equipment glitches, necessitating a reboot or two.  I have enough systems in place that I should be able to automate this process.  To do so, I need to get some remotely controllable equipment, create the state diagram (not good if I power cycle one of the network components required to reach the remote switch and it doesn’t come back up!), and write the scripts to run the logic.

I’d also like to have easily accessible power switches in my data closet so I can power cycle the devices without having to pull them down and unplug the power from the back of them.

Hardware components I’ve looked at

SainSmart 16 channel web relay – at Amazon.  This could work if installed between the transformer block and the switches.

Ethernet relay on eBay, claims to be AC250V @ 10A, though that would probably be pushing it.  Would have to look up the specs on the relays they used.  For the watt draw on the AC, depending upon the size, might be able to install it inside a large surge protector housing and wire the outlets through it.

Controllable Four Outlet Power Relay Module – at Adafruit.  Not network connected, and would require some other device to control it.  But most likely UL listed and designed to handle AC.

Ended up finding a Digital Loggers LPC-3 on eBay for $57 shipped that should do the job nicely.  Manual is here.

Be the first to comment

More 434MHz stuff to look at later

Posted August 20, 2016 By Landis V

Acurite #0899 self emptying rain gauge – at Amazon

Blog post on reversing the signal from Acurite temperature sensors; may be similar for the rain gauges.  Also mentions the RTL SDR.  Probably wouldn’t be bad to have.

Another blog post regarding reading the Acurite 5n1 station.  Possible that part of this will already cover the rain gauge.  Also discusses SDR and mentions the rtl_433 tool.

This blog post looks like rtl_433 supports the Acurite 896 decode natively, so if the protocol is similar or the same it may be simple.

RTL Software Defined Radio – at Amazon – seems like it’s probably a decent model, some good reviews.  Looks like there’s a little more to it than just “buy this and set up the software”.

Bought a cheap receiver off of eBay from Hong Kong for $7.31 (original listing).

Also, here was an Instructable about making a cheap combination RF/Bluetooth/433 MHz remote using an Arduino.

Additional Links

Be the first to comment

On Networks N150R Routers

Posted June 13, 2016 By Landis V

Picked up a couple of these from Newegg for free plus a couple of bucks shipping after rebate.  Figured that in combination with a couple of relays on the GPIOs, I could probably use them for switches or work with the serial port for a sensor connection.  Just a few notes on them.

OpenWRT 15.05 Chaos Calmer patched to expose the GPIOs:  https://micu.webserwer.pl/pmwiki/pmwiki.php?n=OpenWRT.Downloads

Forum thread on not flashing direct to 15.05.1; I went to 14.07, then to 15.05.  https://forum.openwrt.org/viewtopic.php?id=51576

OpenWRT Wiki page with device info including GPIOs https://wiki.openwrt.org/toh/netgear/wnr612v2

Controlling the GPIOs

From here, the simple way to control the GPIOs natively is with the “brightness” value for the LEDs.  By example for the LAN1 LED (others are in the same path):

root@OpenWrt:~# echo 0 > /sys/class/leds/netgear\:green\:lan1/brightness
root@OpenWrt:~# echo 1 > /sys/class/leds/netgear\:green\:lan1/brightness

Update 9/18/2016

Finally got the LAN2 LED peeled off of the board, had a heck of a time with it.  After doing so, I discovered that I only get ~2.5v across the pins when the GPIO is active… not enough to drive my 3.3v relays.  I assume they are probably using a voltage divider here.  Measuring the resistance between the positive and negative ends of the LED without power applied, I get about 1580 ohms one direction, and 670 in the other.  There appears to be a ~960 ohm resistor at CA111, but I haven’t figured out exactly how this ties in.

Update 10/9/2016

Spent some time with this again over the past couple of days.  I removed the resistor at CA111, but apparently it is not a divider.  May need to spend some time to see if I can make something work with a 2N7000 MOSFET or something like that, but I’m pretty novice so that will take some effort.

I did test out my 433MHz ASK receiver on the TTL serial port, but without much luck.  This OpenWRT page was helpful in getting stty installed and setting the baud rate on the serial port,

‘stty -F /dev/ttyS0 9600 clocal cread cs8 -cstopb -parenb’ to set the config, and
‘stty -F /dev/ttyS0 -a’ to verify the config

but still didn’t get any output.  I’ll have to give it a shot with my Raspberry Pi just to see if I can get anything out of there.

Be the first to comment